


 Request a Quote
Well Pump Check Valve: A Complete Guide
What Is A Check Valve on A Well Pump?
A check valve on a well pump serves a crucial role in ensuring the efficiency and reliability of the entire water delivery system. Essentially, a check valve is a mechanical device designed to permit fluid flow in one direction only. In the context of well pumps, this means it allows water to flow from the well into the distribution system while preventing backflow from the system back into the well.
The mechanism of a well pump check valve is straightforward yet essential. It typically consists of a valve that opens when water is pumped from the well, allowing it to move towards the distribution pipes.
Once the pump stops, the check valve closes automatically due to gravity and the pressure differential, preventing water from flowing back down the well shaft. This prevents the pump from having to re-prime itself each time it starts and maintains consistent pressure in the system.
Check valves can be found at various points in a well pump system. Commonly, they are placed just above the pump itself, often directly at the pump’s discharge port.
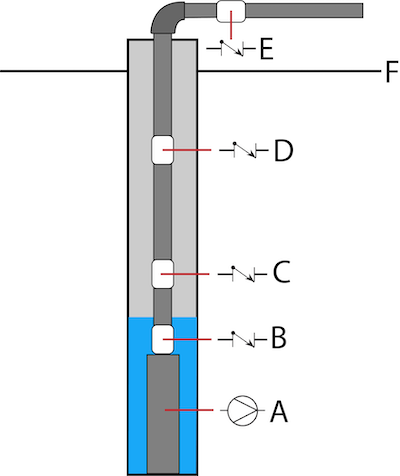
This location ensures immediate prevention of water backflow as soon as the pump stops operating. In some configurations, especially with deep well pumps, multiple check valves may be installed at different stages to maintain efficiency and prevent water hammer effects.
The design of a check valve for a well pump takes into account the specific needs of the system. It must be durable to withstand the pressure and flow characteristics of well water, which can vary widely depending on the depth and extraction rate of the well.
Materials used typically include stainless steel, brass, or durable plastics that can resist corrosion and erosion from the mineral-rich water found in wells. Proper installation is crucial to ensure optimal performance, as a poorly installed check valve can lead to inefficiencies or even premature failure of the pump system.
Check Valves And Their Function
Check valves play a crucial role in the functioning of well pumps, ensuring efficient and reliable operation of the entire water system. Positioned strategically within the piping, usually near the pump outlet, a well pump check valve is designed to allow water to flow in only one direction. This essential function prevents water from flowing back down the well once it has been pumped up, thereby maintaining pressure in the system and preventing unnecessary wear on the pump motor.
In essence, the check valve acts as a gatekeeper, permitting water to move towards the distribution system while blocking any reverse flow. This functionality is especially critical in systems where water is drawn from significant depths, as the weight and pressure of the water column can lead to rapid backflow if not properly controlled.
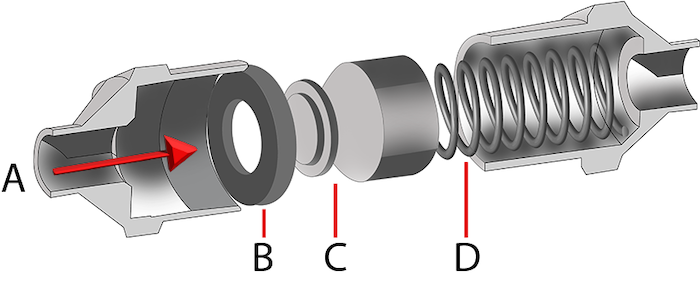
By ensuring that water only moves in the desired direction—towards the household plumbing or storage tanks—the check valve helps maintain consistent water pressure and reduces the workload on the pump. The design of a typical well pump check valve includes a spring-loaded mechanism or a swing mechanism, depending on the specific type used.
Spring-loaded check valves use a spring to keep the valve closed until water pressure from the pump exceeds a certain threshold, at which point the valve opens to allow water to pass through. Once the pump stops, the spring forces the valve closed again to prevent backflow.
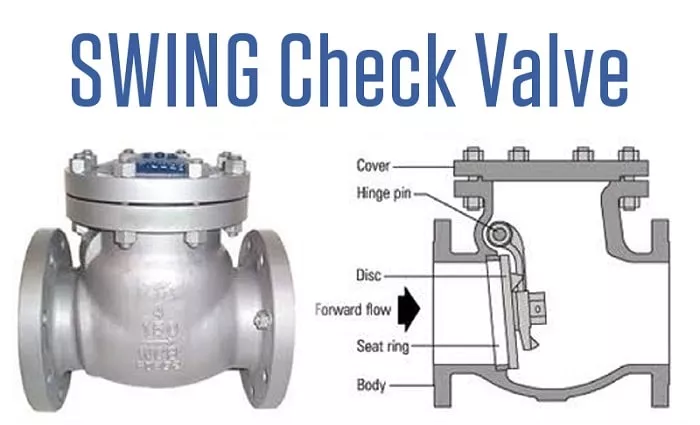
On the other hand, swing check valves use a hinged flap that swings open when water is pumped up but swings shut to block reverse flow when the pump is off. Both designs are effective in their own right, with the choice often depending on factors like system pressure and flow rate requirements.
Proper installation of the well pump check valve is crucial for its effective operation. It is typically installed close to the pump outlet to minimize the distance water can fall back down the well when the pump is turned off.
This proximity ensures that the check valve can quickly close and maintain the pressure in the system, reducing the risk of water hammer—a phenomenon where sudden pressure changes can damage the pump or piping. The exact distance from the pump outlet can vary based on the specific characteristics of the well and the pump system, but it is generally recommended to place the check valve as close to the pump as feasible for optimal performance.
Why Well Pump Check Valves Are Important?
Understanding the importance of well pump check valves is crucial for maintaining the efficiency and longevity of your water system. A check valve on a well pump serves a pivotal role in preventing backflow, ensuring that water flows in one direction only. This function is especially critical in well systems where the pump intermittently cycles on and off to maintain water pressure.
Without a properly functioning check valve, water could potentially reverse its flow back into the well, causing the pump to overwork or even leading to system failure over time. In essence, a check valve for a well pump acts as a gatekeeper, allowing water to exit the pump and travel towards its destination—whether into a household plumbing system or an irrigation setup—while blocking any backward movement.
This simple yet effective mechanism not only saves energy by preventing unnecessary pumping but also safeguards the pump motor from the strain of handling reversed water flows. This protection is particularly vital in preventing rapid wear and tear on the pump components, which could otherwise result in costly repairs or premature replacements.
Moreover, the location of the check valve on the well pump system is strategically chosen to maximize its efficiency. Typically installed near the pump outlet, the check valve ensures that water can move smoothly and consistently through the system without the risk of hydraulic shock or pressure fluctuations.
By maintaining steady water flow direction, the check valve contributes to stable water pressure throughout the entire distribution network, whether in residential, agricultural, or industrial settings. In practical terms, the check valve on a well pump is a silent sentinel, quietly performing its duty without requiring constant monitoring or adjustment.
Its reliability is underscored by its design simplicity—a mechanism that opens and closes based on water pressure differentials—ensuring seamless operation of the entire well water system. For homeowners and water system operators alike, recognizing and appreciating the role of this unassuming valve can make all the difference in the consistent performance and durability of their well pump installations.
Where to Install Check Valve on Water Pump?
Determining the optimal location for installing a check valve on a water pump, particularly in the context of well systems, is crucial for ensuring efficient and reliable operation. A check valve, such as a well pump check valve, serves the essential function of preventing backflow and maintaining pressure within the system. Proper installation plays a significant role in maximizing its effectiveness.
When considering where to install a check valve on a water pump, the primary goal is to place it in a position that effectively controls the flow of water. In the case of well pumps, it is typically recommended to install the check valve close to the pump itself.
This placement helps in immediately halting the backward flow of water once the pump turns off, thereby preventing water from flowing back into the well. By positioning the check valve close to the pump, any pressure loss or potential water hammer effects are minimized, ensuring the longevity of both the pump and the valve.
The check valve for well water systems should ideally be installed on the discharge side of the pump. This location ensures that once the pump ceases operation, the check valve immediately closes, preventing water from reversing its course and flowing back down into the well.
Placing the check valve on the discharge side also helps in maintaining consistent pressure within the system, which is crucial for efficient water delivery and overall system performance. In some installations, particularly in more complex plumbing setups or where there are multiple sources feeding into a single line, it may be necessary to install additional check valves.
For instance, if there are branches from the main line that could create potential backflow paths, installing check valves at these junctions can prevent cross-contamination and ensure each branch operates independently. This approach not only safeguards the integrity of the well pump check valve but also enhances the overall reliability and safety of the water distribution system.
How to Test Check Valve on Well Pump?
Testing the check valve on a well pump is crucial to ensure the proper functioning of the system and to prevent issues such as backflow or loss of prime. A check valve is a one-way valve designed to allow water to flow in one direction only, preventing reverse flow when the pump is turned off.
Testing the check valve involves a few systematic steps to verify its operation. Firstly, before testing, it’s essential to locate the check valve on the well pump system.
Typically, the check valve is installed on the discharge pipe of the pump, between the pump and the water supply line. Its location ensures that water can only flow towards the intended destination, such as the household plumbing or a storage tank.
Knowing the well pump check valve location allows you to target your testing efforts effectively. To begin the test, ensure the power to the well pump is turned off to prevent accidental operation during the procedure.
This precaution is vital for safety reasons and to accurately assess the check valve’s performance. With the pump off, open a faucet or a valve downstream of the check valve to release any pressure in the system.
This step relieves the backpressure and allows you to observe the behavior of the check valve. Next, observe the flow of water when the pump is turned on.
Ideally, when the pump starts, water should flow freely from the discharge side towards the distribution system or storage tank. The check valve should prevent water from flowing backward towards the pump once it stops running.
You can visually inspect the check valve to see if it closes properly when the pump is off, halting any reverse flow. In addition to visual inspection, another method to test the check valve is to perform a pressure test.
This involves pressurizing the system up to the point where the pump would typically turn on. Once the pressure is sufficient, turn off the pump and observe whether the pressure holds steady or drops significantly.
A drop in pressure indicates that the check valve may not be sealing properly, allowing water to leak back. Regular testing of the check valve on a well pump is recommended to catch any issues early and prevent more significant problems down the line.
A malfunctioning check valve can lead to reduced pump efficiency, loss of prime, or even damage to the pump over time. By following these testing procedures, you can ensure that your well pump check valve is in good working condition, contributing to the overall reliability and longevity of your water supply system.
How to Replace Check Valve on Well Pump?
When it comes to replacing a check valve on a well pump, it’s important to follow a systematic approach to ensure proper installation and functionality. Begin by locating the existing check valve, which is typically found near the pump or at the water entry point into the house. Ensure that the pump is turned off and that the pressure in the system is relieved before beginning any work.
Next, determine the type and size of the check valve needed for replacement. Check valves come in various types, including spring-loaded, swing, and inline, so it’s essential to choose the correct type for your system.
Additionally, check the diameter of the valve to ensure compatibility with your existing plumbing. Once you have the replacement valve, start by disconnecting the existing valve from the plumbing.
This may require cutting the pipe if the valve is soldered or glued in place. Be sure to have the necessary tools, such as a pipe cutter or hacksaw, to complete this step.
After removing the old valve, install the new check valve according to the manufacturer’s instructions. This typically involves applying pipe sealant or tape to the threads and tightening the valve into place using a wrench.
Be careful not to over-tighten, as this can damage the valve or the plumbing. Test the new check valve to ensure proper functionality.
Turn the pump back on and observe the water flow to ensure that the valve is working correctly. If the valve fails to hold pressure or allows water to flow back into the pump, it may be installed incorrectly or be defective, and further adjustments or replacements may be necessary.
Materials
When it comes to selecting materials for your well pump check valve, several considerations must be taken into account to ensure reliability and longevity. The check valve plays a crucial role in the efficient operation of your well pump system, preventing backflow and maintaining pressure within the piping network.
Here’s a detailed look at the materials typically used in manufacturing check valves for well pumps:
Construction Materials
Check valves for well pumps are commonly constructed from durable materials such as stainless steel, brass, or thermoplastics like PVC (Polyvinyl Chloride) or CPVC (Chlorinated Polyvinyl Chloride). Each material offers distinct advantages based on factors such as corrosion resistance, pressure rating, and compatibility with the pumped water.
Stainless steel check valves are renowned for their strength and resistance to rust and corrosion, making them suitable for applications where water quality may vary. Brass check valves are valued for their robustness and ease of installation, ideal for residential well systems.
Thermoplastic valves like PVC and CPVC are lightweight, affordable, and resistant to chemical reactions, making them suitable for a wide range of water qualities and environmental conditions.
Seals and Seats
Critical components within the check valve are the seals and seats, which ensure a tight closure to prevent water from flowing backward. These components are typically made from materials such as Buna-N (Nitrile rubber), EPDM (Ethylene Propylene Diene Monomer), or Viton (Fluorocarbon rubber).
Buna-N seals are widely used due to their cost-effectiveness and compatibility with water and oils, making them suitable for standard well water applications. EPDM seals offer excellent resistance to weathering, ozone, and UV exposure, making them ideal for outdoor installations where the valve is exposed to sunlight.
Viton seals provide superior chemical resistance and high-temperature tolerance, making them suitable for more demanding applications or where water quality may include contaminants.
Springs and Internal Mechanisms
The internal mechanism of a check valve includes components like springs and disks, which are crucial for controlling the opening and closing of the valve. Springs are typically made from stainless steel or other corrosion-resistant alloys to ensure durability and consistent performance over time.
The disks or flappers are designed to provide a secure seal against the valve seat under varying pressure conditions. Proper selection of these materials ensures that the check valve operates smoothly, minimizing the risk of leaks or failure that could compromise the efficiency of the well pump system.
Choosing the right materials for your well pump check valve involves assessing factors such as water quality, system pressure, environmental conditions, and budget constraints. By selecting high-quality materials and components, you can ensure that your well pump check valve performs reliably and efficiently, contributing to the overall effectiveness of your water supply system.
FAQs
Where is a Well Pump Located?
A well pump is typically located either inside the well itself or near the well. There are two main types of well pumps: submersible pumps and jet pumps.
Does a Well Pump Need a Check Valve?
Yes, a well pump typically requires a check valve. The check valve prevents backflow, ensuring that water does not flow back into the well once it has been pumped out. This maintains pressure in the system and prevents the pump from losing its prime, which could cause it to overheat and fail.
How often should a well pump check valve be inspected or replaced?
Check valves should be inspected at least once a year to ensure they are functioning correctly. If the valve shows signs of wear, leakage, or fails to hold pressure, it should be replaced immediately to prevent damage to the pump and maintain water system integrity.
What is the difference between a foot valve and a check valve in a well system?
A foot valve is a type of check valve installed at the bottom of the well on the intake side of the pump. It combines a check valve with a strainer to prevent debris from entering the pump. Both foot valves and check valves prevent backflow, but foot valves are specifically designed for the intake side, whereas check valves are used on the discharge side of the pump.
What maintenance is required for a well pump check valve?
Regular maintenance for a well pump check valve includes periodic inspections to check for leaks, corrosion, and wear. It is also important to clean any debris from the valve and ensure it operates smoothly. Replacing the check valve if any issues are detected is crucial to prevent damage to the pump.
Conclusion
Understanding the role and significance of the check valve on a well pump is crucial for maintaining efficient and reliable water supply systems. The check valve, positioned strategically either before or after the pump depending on the system design, serves as a vital component to prevent backflow and ensure steady water flow in the intended direction. Its operation is relatively simple yet pivotal, allowing water to pass through while blocking reverse flow, thereby safeguarding the pump and associated plumbing from damage caused by water hammer or backflow pressure.
Installing the check valve correctly is paramount. Whether it’s located at the discharge side of the pump to prevent water from flowing back into the well or at the inlet to maintain prime and prevent pump damage, its placement directly influences the system’s performance and longevity.
Proper installation ensures optimal function and reduces the risk of pump wear and tear due to unnecessary cycling or pressure fluctuations. Regular testing and maintenance of the check valve are essential practices for ensuring continued reliability.
This involves periodic inspections to verify its sealing integrity and functionality. Testing typically includes checking for leaks, ensuring the valve opens and closes properly, and confirming that it effectively prevents reverse flow.
When replacement is necessary due to wear or malfunction, selecting a suitable replacement check valve designed for well pump applications ensures compatibility and optimal performance. While the check valve on a well pump may seem like a small component, its role in maintaining water flow integrity and protecting the pump system from damage cannot be overstated.
By understanding its function, ensuring correct installation, performing regular testing, and promptly replacing worn-out valves, homeowners and professionals alike can effectively safeguard their water supply systems. This proactive approach not only enhances operational efficiency but also prolongs the lifespan of the entire well pump setup, ensuring reliable water access for years to come.

